September 5th, 2008 by katie
This is a great party contribution, especially for an outdoorsy, barbecue-type party. Although really anytime you want to impart a little summery fiesta attitude into a regular old party, feel free to bring this salad. Also a great side dish for taco night or with fajitas, just expect leftovers for lunch the next day.
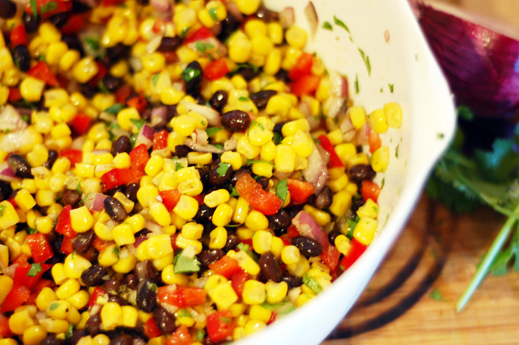
Black Bean and Corn Salad
makes approx 6 cups, prep 20 min
- 1/4 cup olive oil
- 2 tbsp lime juice
- 1 tbsp red wine vinegar
- 1 clove garlic, minced
- 1 1/2 tsp cumin
- 1 1/2 tsp oregano
- 1 1/2 tsp salt
- 1/4 tsp sugar
- 1/8 tsp black pepper
- 1 (15 oz) can black beans, drained and rinsed (start with 1/2 a can)
- 1 (16 oz) frozen corn, thawed (could also used canned or fresh or grilled)
- 1/2 red onion, diced
- 2 small tomatoes, diced
- 1 sweet red bell pepper, diced
- 1-2 jalapenos, minced
- 1/4 cup cilantro, finely chopped
- Whisk together the first nine ingredients, oil through black pepper.
- Combine all your chopped vegetables-beans, corn, onion, tomato, peppers and cilantro-and toss in the dressing.
- Best when prepared ahead of time and allowed to sit in the refrigerator. I usually try to make it the day before but you could even make it a couple days ahead.
This salad can really be made to suit your tastes. I have made it both with fresh red bell peppers as well as roasted red peppers from the jar. I have forgotten the tomatoes and added more or less jalapenos and cilantro, or substituted serranos for the jalapenos. I am not sure I ever make it the same way twice because, as I’ve said before, I am unable to just accept it and leave a good recipe alone.
Posted in Easy, Salads, Sides, Snacks/Appetizers having 6 comments »
September 3rd, 2008 by katie
I always imagined cooking delicious, tender ribs to be some restaurant secret. I figured attempting to cook ribs at home would be complicated, time consuming and would result in a tough, possibly inedible waste of money. Lucky for us, I took the chance one year and I’ve been making these delicious ribs ever since. They are one of my favorite meals to make for company or a crowd because they are so easy and impressive. Just keep in mind, regardless of who does all the work-cleaning, preparing, rubbing, wrapping, and cooking the ribs-the person who actually grills the meat for 10 minutes in the final step will be the one who gets the credit for making the ribs.

The key to making restaurant tender ribs at home is the cooking technique-which is quite simple. You can use any spice rub combination you like or simply salt and pepper, which is how I make them when the kids are eating. My grown-up rub consists primarily of kosher salt and fresh cracked pepper, garlic powder, brown sugar, Worcestershire sauce, and lime juice then equal amounts of cumin, cayenne, paprika and mustard. mrChaos’s rub is here. I simply add a teaspoon of this or that until it smells right. The cooking method then is as follows:
Baby Back Ribs
serves 4, prep 10 min, cook 3 1/2 hours
- Clean ribs and remove silver skin fat from the back. It should pull right off if you can get a good grip on it. Don’t worry about it too much, they’ll be delicious either way.
- Place each rack atop two sheets of heavy duty foil. Rub ribs with spice mixture all over.
- Fold and wrap foil around each rack. At this point you can place them in the fridge to marinate or put them directly in the oven.
- When you are ready to cook preheat oven to 300°F and place rib packs on a rimmed baking sheet. You want to catch any juices if your packets leak or your oven will be a mess.
- Cook ribs for 3 hours. Remove a rack and unwrap a small section to check for tenderness. You should be able to twist the bones in the meat with little resistance. If not, re-wrap and put them back in the oven checking every 1/2 hour.
- Heat the grill and dilute barbecue sauce with a little water until it is thin and brush-able.
- Unwrap cooked ribs and transfer them carefully to the grill and brush with barbecue sauce.
- Grill over a high flame for a few minutes, or until charred.
- Alternately, you can crisp them up under the broiler in the oven if you don’t have a grill. Just give them a nice crust.
Follow these same steps regardless of how many racks of ribs you are cooking. I have cooked as many as six racks at a time piled up in the oven and it works just fine, although you may need to allow for a slightly longer cooking time.

What’s for dinner this week?
Posted in Easy, Main Dish having 11 comments »
September 1st, 2008 by katie
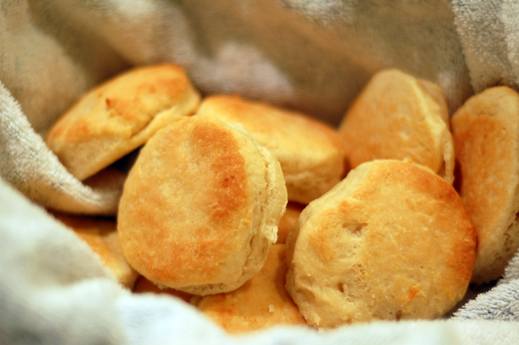
Look I actually made homemade biscuits! It wasn’t nearly as hard as I had imagined it would be, although I definitely need some practice. When I was planning my mother’s annual birthday dinner of fried chicken, coleslaw, and carrot cake, I thought homemade biscuits sounded like the perfect accompaniment. However the prospect of actually making biscuits from scratch was a bit terrifying. So I sought out an expert. I had been really wanting an opportunity to try this biscuit recipe because I adore the Homesick Texan blog and Lisa actually makes biscuits from scratch seem possible and even easy. Plus, I didn’t need shortening-which I didn’t have on hand.
The result was delicious. They didn’t rise a whole lot but for my first biscuit making experience, I had a lot to contend with. First I par-baked them because I needed to time them with the generally disastrous fried chicken. Second, my mother keeps her thermostat at 82°F before we started cooking. So my butter kept pretty much liquefying immediately. So first time issues aside, these biscuits were delicious! I can’t wait to try them again, and continue until I get them golden and perfect. And then I will freeze them so we can make biscuits and gravy any lazy weekend without having to run to the store first to get canned ones.
Photo Update: Try these with a little Better Butter.
Posted in Breakfast, Fast, Sides having 8 comments »
August 30th, 2008 by katie
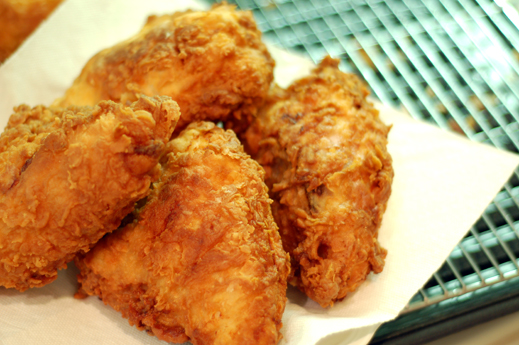
Every year, without fail, in addition to carrot cake, my mother asks for this flavorful fried chicken for her birthday dinner. Most years I burn the breading while the inside is still raw and we sit around watching while the salvaged, non-burned pieces finish cooking in the oven. I always deep fry one or two fingers and usually ruin one or two pieces of kitchen equipment. This year was different. This year I anticipated all or these problems and had planned against them. And this year it actually worked. I did deep fry my fingers, as usual, but the chicken breasts came out perfectly breaded, golden and crispy, and thoroughly cooked and juicy.
Buttermilk Fried Chicken
Serves 6, prep 10 min, cook 40 min, brine several hours before to overnight, adapted from Recipezaar
Brine Ingredients
- 1 cup kosher salt
- 1/2 cup sugar
- buttermilk, cream, or milk to cover
Breading
- 2 cups buttermilk
- 2 eggs
- 1 tsp paprika
- 1 tsp hot sauce
- 1/2 tsp black pepper
- 2 tsp baking powder
- 1 1/2 tsp baking soda
- flour
- 6 skin-on, bone-in chicken breasts, or chicken pieces
- peanut oil
- Prepare the brine by pouring about a cup of milk into a large container that will fit all of your chicken. Whisk in the salt and sugar until well combined and then add all of your chicken pieces. Add additional milk until all chicken is covered. Cover your container and refrigerate for a couple hours or overnight.
- Rinse chicken breasts and blot on paper towels until dry. In a deep bowl combine all the liquid ingredients and spices, buttermilk through black pepper, and whisk to combine. In a separate dish combine baking powder and baking soda, then when ready to bread whisk into buttermilk until foamy.
- Set about 4 cups of flour in a shallow dish alongside the buttermilk batter.
- Heat 1 or 2 deep pots with several inches of peanut oil. I usually only attempt one batch of three breasts at a time. If you overcrowd your pot your oil will cool and not cook as well so consider the size of your chicken pieces and your pot sizes.
- Start by dredging your chicken completely in plain flour, shaking off any excess. Dip into buttermilk mixture until fully coated then allow excess to drip back off. Then coat again in flour and place coated breast on a rack placed over a rimmed baking sheet to contain the floury mess.
- Repeat with all chicken pieces, add fresh flour as needed.
- Check your oil by dropping a chunk of battered flour into the pot. If there are no or few bubbles your oil is not hot enough. If it immediately blackens and smokes then it’s too hot. If you have a candy or deep fryer thermometer the temp you want is about 350°F.
- Once your batter chunk bubbles and floats and slowly turns golden, your oil is ready. Using tongs, gently lower each chicken piece into the oil. Cook approximately 20 minutes, turning half-way through when batter is golden and begins to brown.
- Check cooked chicken with a meat thermometer, however don’t be surprised if it gives you a wacky number, my meat thermometer never says what its supposed to. Regardless of the reported temperature, if the juices run clear when you remove the meat thermometer you are probably good. Sprinkle with Kosher salt if desired and place in a warm oven while you cook the second batch of chicken, if necessary.
- Serve with coleslaw and biscuits and have someone who loves you lined up to do the dishes.
Try these dishes with your fried chicken:


Posted in Main Dish having 11 comments »