Happy Father’s Day! Top Sirloin in Red Wine

June 15th, 2008 by katie

Top Sirloin in Red Wine

In typical Father’s Day fashion: we’re having steak. I did break from the mold, however, and chose a pan seared steak rather than a grilled one. Daddy Chaos loves this steak that a friend of his made for him at a party recently. Thanks, Greg for sharing your recipe with us, we’ve made it at least three times since then.

Top Sirloin with Red Wine Sauce

Serves 2-4, marinade time: 1 hour, cook time: 10 min
  • 1 top sirloin steak 2-3 lbs
  • 2 cups approx. good red wine
  • garlic powder
  • salt
  • fresh ground pepper
  • oil
  • 1/2-1 stick of butter (4-8 tbsp), chopped into little bits
  1. Using a bowl or dish that is large enough to hold your sirloin, fill with about a 1/2 inch of red wine. Whisk in garlic powder, salt and pepper. I usually use about 1-2 tsp each of garlic powder and salt and about 1/2 tsp of fresh cracked pepper. You want to choose a wine that you enjoy drinking because this will become the basis of your sauce later on. We tend to use Cabernet blends that have some shiraz/syrah components because they really stand up to the meat well.
  2. Marinade the steak at room temperature for about an hour. It is ok for it to be unrefrigerated for that long and it will help the meat warm up a bit to room temperature. This keeps the steak juicy.
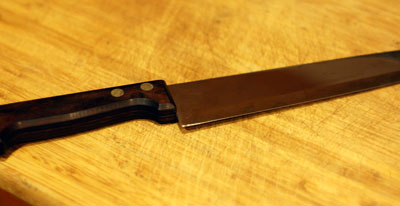
  3. We use a cast iron pan, but you could use any not nonstick pan you have. Get your pan nice and hot and add a little oil. Using tongs to place steak in the pan, sear the steak on each side for about 1 1/2 minutes. Remove from pan when medium rare. We use the finger method to determine the doneness of steaks. Elise at Simply Recipes has a great explanation. This prevents juices from escaping when using a meat thermometer. We usually do pretty good-somewhere between medium rare and medium.
  4. Allow steak to rest for 10 minutes while you make the sauce. It will continue to cook a bit during this time so don’t worry if you feel you pulled it a little early.
  5. Add the marinade wine to the hot pan, scraping up all the browned steak bits. Boil the wine uncovered until it reduces by about 1/2.
  6. Take the pan off the heat and monté au beurre the sauce. Fancy, huh? I know! Monté au beurre means to stir in your bits of butter until a nice sauce develops. Take the pan off the heat and whisk in chunks of the butter, a little at a time, tasting as you go, until the color of the sauce lightens and it becomes rich and velvety. You don’t want the pan too hot or too cold because the butter won’t incorporate properly, however you have a good window-we’ve haven’t ruined it yet. Just be sure you are constantly stirring and moving your sauce.
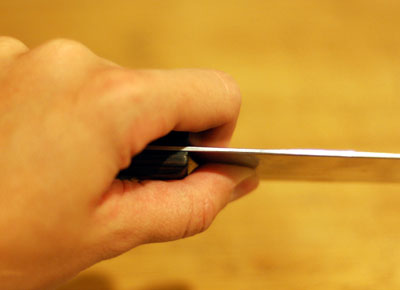
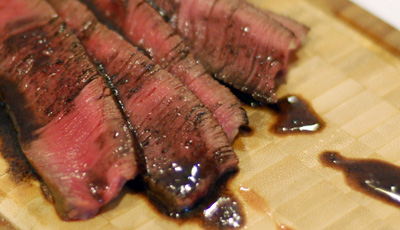
  7. Adjust the seasonings in the sauce if necessary. Slice the sirloin thinly against the grain, and serve with the sauce drizzled over the top and alongside.
  8. This is a great recipe to serve with simple steamed vegetables. Both because the meat is so delicious and because they can be made quickly while you are making the sauce. We like sugar snap peas and mashed potatoes.

Posted in Main Dish, Wine having no comments »

So you can’t stay on budget either?

June 14th, 2008 by katie

Came across this awesome budget tip from Wisebread’s Jason White.  The reason I say this is an awesome budget tip is that I am pretty bad at staying on budget at the grocery store and I think this method can help me.  Over the years, I have tried all kinds of tricks to keep myself on budget.  I’ve tried setting hazy budget “guidelines,” to keep me from feeling hemmed in, to actually withdrawing the exact cash amount allotted for the trip (with the theory that once the cash is gone it is time to stop shopping-yeah right).  The trouble is that while I can get very close to and even stay within my budget at times, this happens purely by luck and not by any real effort on my part.  Which, of course, means I can also go totally overboard with no real idea of how to control myself.  The reason Jason’s strategy may actually help me is this:  I rarely have a method by which to estimate the amount I am spending until I am at the cash register.  As far as I am concerned, once it’s been loaded on the belt, rung up, and bagged there’s no going back. 

With this method, however, I can keep a running estimate that ensures I come in under budget.  And-here’s a novel thought-when my virtual total equals my very real budget amount, the shopping trip really is over.  Or as Jason puts it:     

When the shopping cart is full, or your list is complete, grab your calculator and multiply the final total by your tax rate to estimate sales tax owed. Add this amount to your running total for grocery purchases. If this amount is less than your food budget you’ve done well. If not, return to the aisles to look for cheaper alternatives, or move that steak dinner to next week’s menu schedule.

Jeez, Jason, way to make me feel both greedy and irresponsible…

Another good reason to keep a running total: junk food is expensive.  When a $4 bag of chips is staring at me from the list and I haven’t even gotten to the milk aisle yet, I might just forgo the chips all together.  Or maybe I won’t, but the point is it’ll have been a less impulsive choice to use 1% of my grocery budget on those chips.  And, Jason is right, often there are cheaper alternatives that I don’t consider.  I have a tendency to need everything on my list.  I don’t stop to think about alternatives because I need it all, right now.  I need all of the stuff I put in the cart that wasn’t on the list too.  I didn’t realize I needed them at home but now I do.  Only, if I actually forced myself to make a choice, I could make substitutions.  I won’t willfully go over the budget, so knowing beforehand that I am at my spending limit really will make a difference in the way I shop.  Hope, wish, hope!     


Posted in Budget having 1 comment »

Knife Skillz

June 12th, 2008 by katie

Our current chef's knife-waaay too big for me

Knife Skills class was fantastic! I got to try a couple of different sizes of chef’s knives and settled on an 8 inch for Daddy Chaos and a 6 inch for myself. We also got a quick lesson on all the different kinds of knives out there. We practiced several different cuts: julienne, dice, chiffonade, mince, and supreme. We learned proper grip of the knife and how to safely grip the food we’re cutting. Overall, it was a very fun way to spend a few hours and we definitely came away feeling more confident in our knife skills. Practice definitely makes perfect, so now we need to pick up a few knives and get to work.

Types of Knives

There are pretty much as many specialized knives as there are kitchen tasks. Some common ones are: paring, peeler, utility, bread, carver/slicer, chef, santoku, boning, filleting, lettuce, cheese and steak knives. On our counter top we have a universal knife block. This way we can buy the best individual knives for us rather than a big, expensive set that has a bunch of knives we won’t ever use. Currently we have several santoku knives(santoku refers to the shape of the blade, not the hollows on the side, I learned), but after our class we will be switching over to chef’s knifes. I really liked the slight curve of the chef’s knife. Being able to rock the blade over the cutting board really made the typical cuts a lot easier. We also have a long, serrated bread knife, and several sharp paring knives. We have a bunch of other mixed knives but will probably get rid of most of them and invest in a good slicer, a good utility knife, and maybe a cheese knife.

Knife Care: Steeling & Sharpening

The long metal rod that came with your knife set is the steel. Using it every time you use your knife will keep your knife feeling sharp much longer. It isn’t actually sharpening the knife, however. Making contact with the cutting board over and over bends the blade of your knife, making it feel dull. Rubbing it a against the steel a few times just bends it back so it is nice a straight and sharp again. Be sure to use even strokes, the same number on each side of the blade, and start from the hilt of the knife and pull back all the way to the tip each time holding the knife at about a 20° angle. Doing this frequently will significantly extend the period between real sharpening.

You should get your knives professionally sharpened about once a year depending on use. Sharpening needs to happen on a wet-stone, belt or by machine. Don’t attempt it yourself unless you know what you’re doing because you will probably ruin your knife. Lastly, always wash your knives by hand and store in plastic or wooden slots to keep the blades from banging against each other.

Knife Grip

Gripping the blade, not the handle

The best way to hold a knife is to actually grasp the blade between your thumb and forefinger just in front of the bolster (the place where the blade meets the handle). Then grip the handle with the rest of your fingers. This gives you the most control over the blade. I find it really hard not to extend my finger along the spine of the blade, but it really isn’t as secure that way.

Follow along the Knife Skillz Series:

Posted in Tips and Tricks having 3 comments »

Italian Garlicky Meatloaf-and you thought you didn’t like meatloaf!

June 11th, 2008 by katie

I would almost make this meatloaf simply for the way it makes the house smell.  It is quick to put together, I usually have the ingredients all on hand, and it really has the most wonderful aroma that permeates the whole house.  For those you-I know you’re out there-who don’t cook for 4-6, this is a great recipe to make ahead and eat leftover or to slice and freeze for another meal another day.  I also use this recipe to make my meatballs.

I would use 85/15 ground beef for this.  Any leaner and there won’t be enough fat to soften the bread crumbs, so if you choose sirloin you might want to reduce the bread crumbs to 1/4 cup or simply add them at the end as needed.

Meatloaf

serves 4-6, prep: 10 min, cook: 90 min (allow to rest before slicing)
  • 1/2 – 1 cup bread crumbs
  • 5 tbsp grated Parmesan or Romano cheese
  • 5 tbsp minced parsley, dried is fine
  • 2 tbsp minced garlic, this is about 6-8 minced cloves
  • 1/2 tsp salt
  • 1/2 tsp fresh ground pepper
  • 2lbs ground beef
  • 2 eggs
  • ketchup!
  1. Preheat oven to 350ºF and grease a shallow casserole dish.
  2. Mix a 1/2 cup bread crumbs, cheese, parsley, garlic, salt, and pepper until well combined.
  3. Mix in ground beef until you have a uniform mixture.
  4. Add eggs and knead in until mixture resembles a sticky dough ball.  It should hold it’s shape and not be too dry or crumbly-add some water-or to sticky and sloppy-add some more bread crumbs.
  5. Mold the meat mixture into a loaf and place in a casserole and top with a layer of ketchup.  I thought that sounded totally gross when I made this for the first time (never really ate a lot of meatloaf, so I didn’t know) but it is actually a nice topping, the sugar in the ketchup caramelizes slightly in the oven and it adds a nice tomatoey contrast.
  6. Bake for 90 minutes. Center should be 160ºF. Slice once slightly cooled and serve or make ahead and serve reheated.  Like any really good meatloaf recipe, the leftovers get better and better.
  7. While meatloaf is baking, clean up kitchen (do it!) and prepare appropriate sides, like veggies.

This is a great meal to double and stash away in the freezer because the leftovers are just as great.  To reheat a meatloaf, thaw if necessary, place the loaf or however many slices you’d like in a casserole and bake at 350°F for about 20 minutes or until warmed through.  Alternately you can just microwave slices or pan fry them as well.

Posted in Main Dish having 6 comments »

About chaos

cha·os -noun 1. a condition or place of great disorder or confusion. My chaotic kitchen is the result of three kids, two adults, dog, cat, and fish, a food obsession, a wine drinking hobby, and too few hours in the day. Between trying to feed a family of five healthy, happy meals, watching my weight, saving my pennies, and staying partially sane I have picked up a few tricks along the way. So here they are: the very best tips, tricks, and recipes from my chaotic kitchen-to yours!

Blog Widget by LinkWithin